These products are a collection of fan and hose adapters to go from popular fan sizes to popular hose sizes. The products are just the adapters as they are intended to help the DIYer vent their own systems. Even though the pictures show fans as well, you have to buy those yourself!
The pieces that take you from a fan to a hose are called "fan to hose adapters". The pieces that take you from a hose to an outside vent are called "hose to vent adapters". Each adapter is designed to fit M4 screws; the length depends on the thickness of the material you're connecting, but typically 12-14mm screws work fine.
To complete venting to the outside you can find flexible 4" dryer duct hoses or flexible 3" hoses online or at most hardware stores. This can be connected to the outside using the same techniques you'd use for a clothes dryer, or you can purchase one of the many compatible window-venting kits. Note: 3D printer enclosure fans typically don't generate enough pressure to push open vent kits with flaps on them, so you should remove the flaps.
For fans you can find 60mm (13CFM), 80mm (30CFM), and 120mm(50-70CFM) fans online anywhere. But for extra power checkout our A/C Infinity Inline 4 inch fan that runs up to 120CFM.
Included
- Adapter 3D printed in ABS
- 14mm M4 Screws (4)
- 50mm M4 Screws (4)
60mm 3D Printer Vent Configuration Example
With a small 60mm vent hole we prefer the 3in hose since it is small and doesn't overwhelm a small enclosure. To make this feasible this setup adds a 3in hose to a 4in vent adapter. With this setup, you also need to separately purchase two 3in clamps and one 4in clamp.

80mm 3D Printer Vent Configuration Example
Here's an example setup with an 80mm vent hole and 80mm fan. For this setup, you'd need to order a hose, clamps, and dryer window vent from your hardware store.

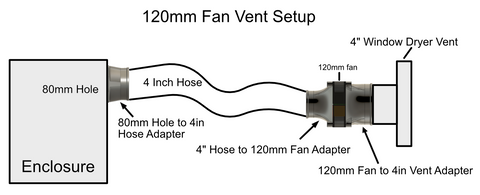
120mm Fan Configuration Example
This is the most powerful configuration with standard fans. It is different in that the fan is mounted on the exterior vent as it exits the room, not on the side with the printer. This has the advantage of creating negative pressure down the line so that any leaks in the system bring air into the hose rather than blowing out VOCs.
You would take the hose from your enclosure in 3 inches or 4-inch size, and connect it using a 3 inch or 4 inches to 120mm fan adapter. To make the fan fit on a 4-inch dryer vent you'd also need the 120mm Fan to 4-inch dryer vent adapter.

Here are some typical values for 5V USB fans. Again, these are NOT included with the adapters, but we're listing them below to help you plan.
| Size |
60mm |
80mm |
120mm |
| Voltage |
5V USB |
5V USB |
5V USB |
| Speed |
3200RPM |
2500RPM |
1200-1800RPM |
| Airflow |
12.6CFM |
29CFM |
50-70CFM |
| Noise |
24dBA |
26dBA |
22-38dBA
|
If you want to DIY one of these vents with your own enclosure, here is the 60mm hole pattern and the 80mm hole pattern. (Note: the units are in mm.)
The installation guide is also quite helpful.